

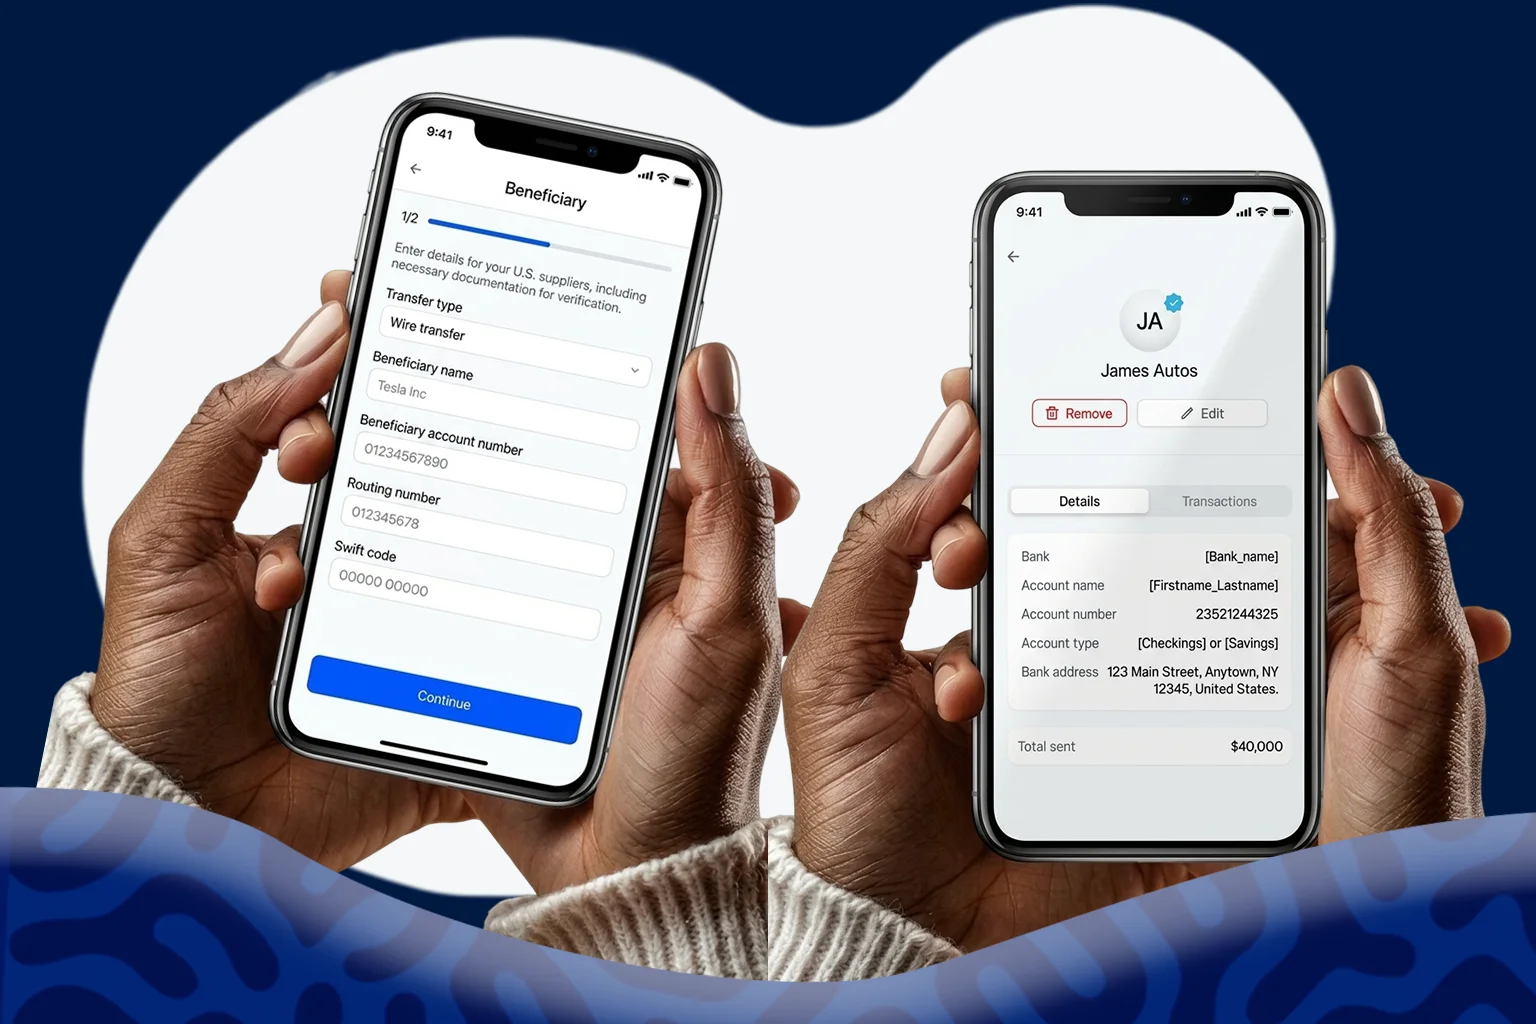
Anyone who sends money abroad regularly knows the small frustrations: hunting down a SWIFT code in an old email, double-checking an account number for the third time, retyping the same supplier details on every payment.
Clea’s beneficiary feature handles that part for you. Add a vendor once, and their information is saved to your account for every payment that follows. Here’s how to add and remove beneficiaries on Clea, step by step.
What You’ll Need Before You Begin
Before you start, gather your beneficiary’s details so you can complete the process in one sitting. For an international transfer, Clea will ask for:
- The beneficiary’s full legal name, exactly as it appears on their bank account, or their registered business name
- The type of beneficiary, whether individual or business, and the industry they operate in
- Their relationship to you – supplier, business partner, and so on
- The address and country where the beneficiary is based
- The bank account number and account type
- Your preferred payment method
- The bank’s routing code, full name, and address
Confirm these directly with your supplier or vendor in writing. Inaccurate bank information, whether it’s a wrong account number, a misspelled bank name, or an incorrect routing detail, is one of the most common reasons international transfers get delayed or returned.
How to Add a Beneficiary on the Web
Step 1: Sign In to Your Clea Account
Visit the Clea web platform and sign in with your registered credentials. If you haven’t completed verification, you’ll need to finish that first before you can add beneficiaries or send payments.
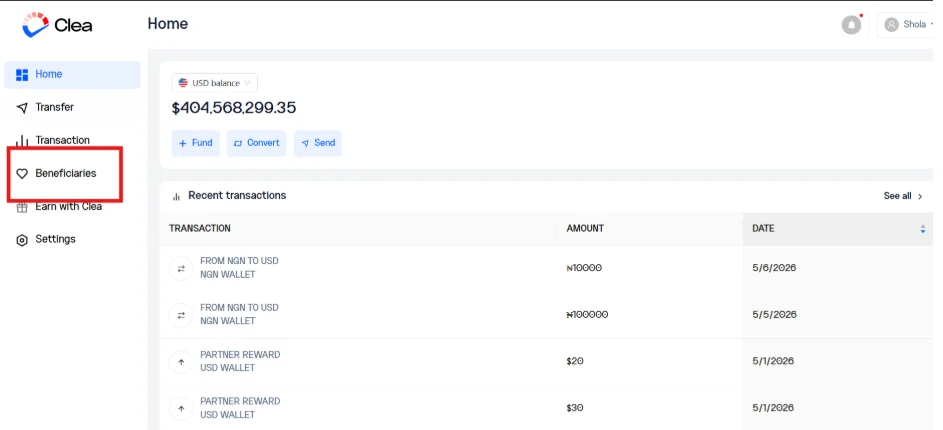
Step 2: Navigate to the Beneficiaires Section
From your dashboard, locate and select the Beneficiaries section. This is where every vendor, supplier, and partner you’ve saved will appear, along with the option to create new entries.
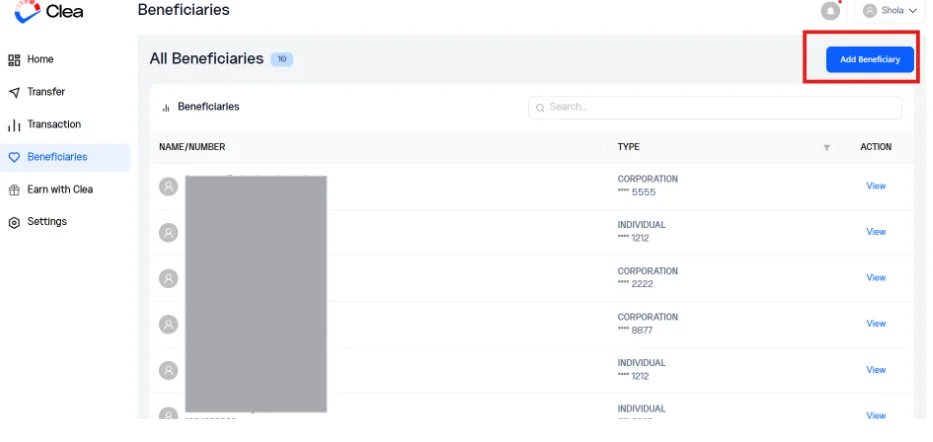
Step 3: Start a New Beneficiary Entry
Click Add Beneficiary to open the beneficiary creation form.
Step 4: Complete the Beneficiary Profile
The first section captures the identity of the person or business you intend to pay. Fill in the following fields carefully:
- First and last name: for individuals, enter the legal name as it appears on their bank account. For businesses, enter the registered company name.
- Beneficiary type: select either individual or business.
- Industry: choose the sector your beneficiary operates in.
- Relationship: use the dropdown to select how this beneficiary relates to you, for example, supplier or business partner.
- Address and country: enter the beneficiary’s physical address and the country where they are based.
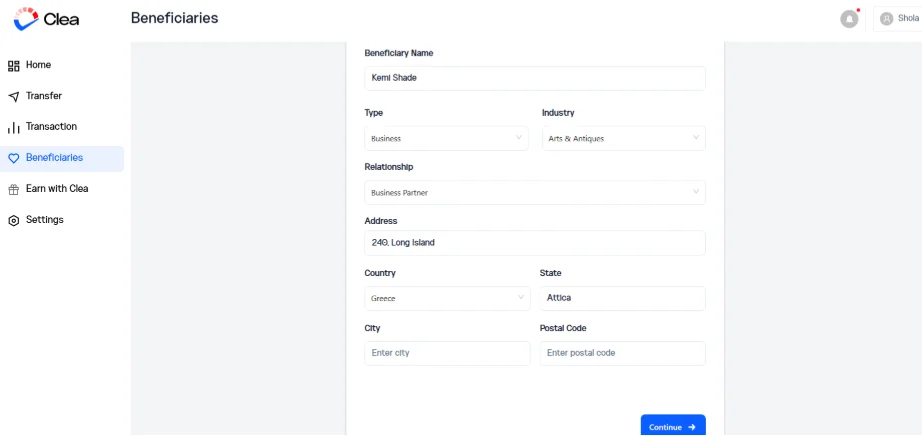
Once all the fields are complete and accurate, click Continue to proceed.
Step 5: Enter the Account Details
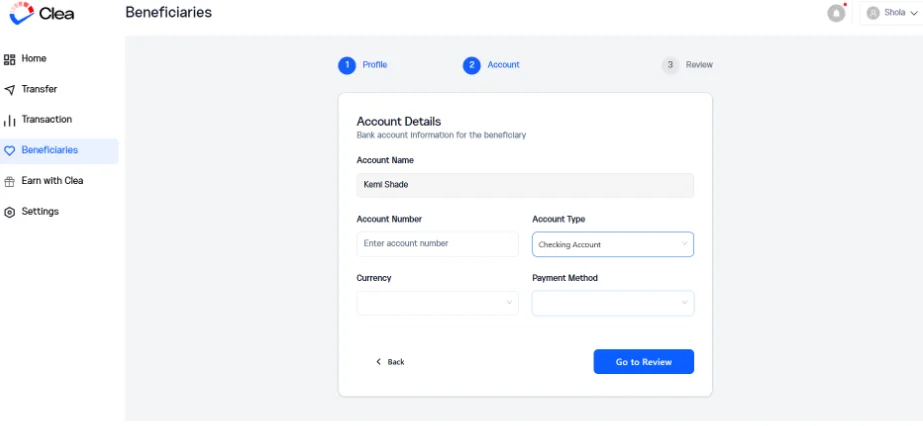
The next section captures the banking information Clea will use to route your payments. You’ll be asked to provide:
- Account number – the beneficiary’s full bank account number
- Account type – for example, checking or savings
- Payment method – how you’d like the funds to be sent
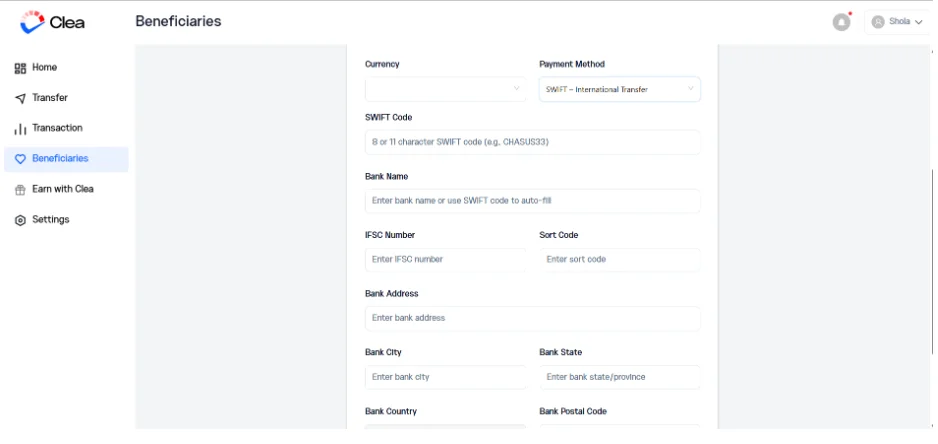
For international transfers, you’ll also need to provide the relevant routing details for your chosen payment method, for example, a SWIFT code for wire transfers, or the appropriate routing information for ACH, FPS, and other methods. Clea will prompt you for the right fields based on the payment method you select. Take particular care with these details, as a single incorrect character will cause the transfer to fail or be misdirected.
Step 6: Review the Information
Click Go to Review to see all the details you’ve entered laid out in a single summary. Read through each field carefully and compare it against the source documents your beneficiary provided.
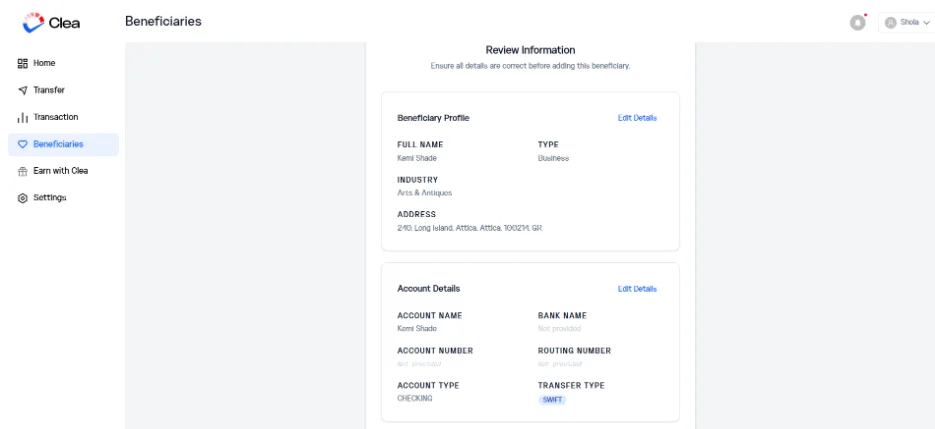
Pay close attention to:
- The spelling of the beneficiary’s name
- The accuracy of the account number
- The SWIFT code, character by character
- The bank name and address
If anything is incorrect, return to the relevant section and update it before proceeding.
Step 7: Submit and Save the Beneficiary
When you’re confident every detail is correct, click Submit Beneficiary. The profile is now saved securely to your Clea account and is ready to receive payments at any time.
How to Remove a Beneficiary on the Web
Your beneficiary list should reflect the vendors you actively work with. Outdated entries, like old suppliers, agents you no longer use, or profiles created with details that have since changed, can clutter your dashboard and increase the risk of selecting the wrong recipient when you’re sending a payment in a hurry.
Removing a beneficiary on Clea takes a moment.
Step 1: Open the Beneficiaries Section
From your dashboard, navigate to the Beneficiaries section, where all your saved profiles are listed.
Step 2: Select the Beneficiary You Want to Remove
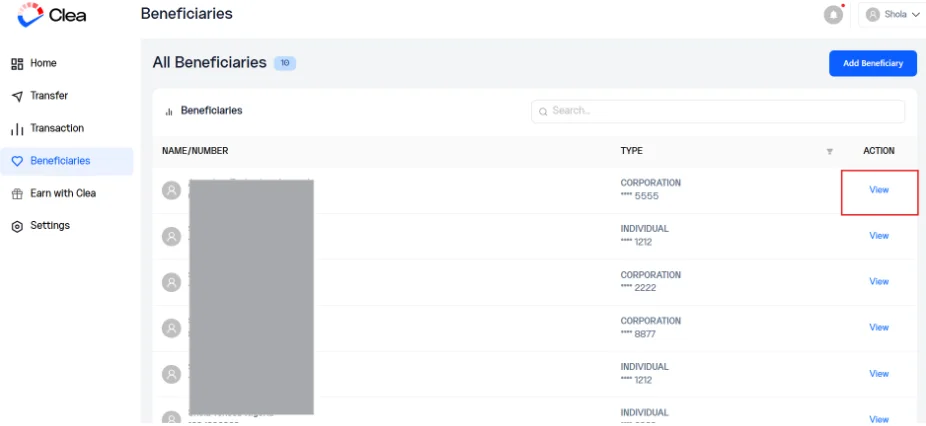
Tap or click on View to select the saved beneficiary you no longer need. This will open their full profile.
Step 3: Select Remove
Within the beneficiary’s profile, select the Remove option.
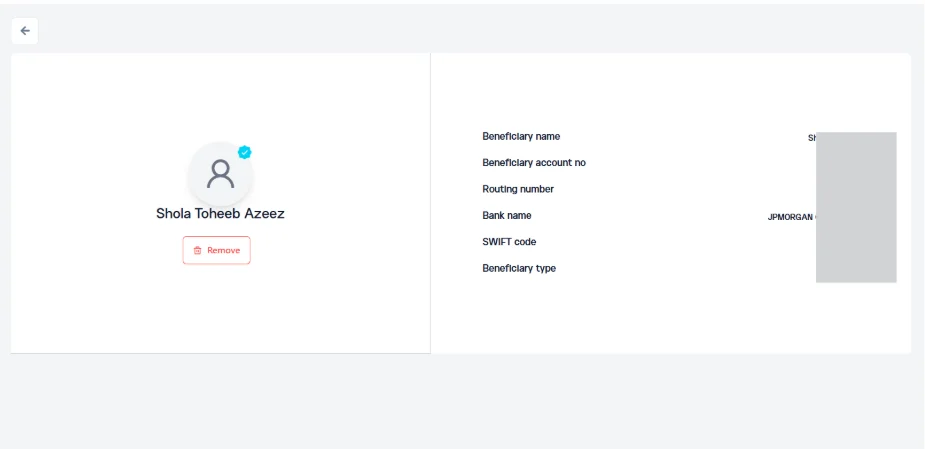
Step 4: Confirm the Removal
A confirmation prompt will appear. Click OK to confirm. The beneficiary is now permanently removed from your account.
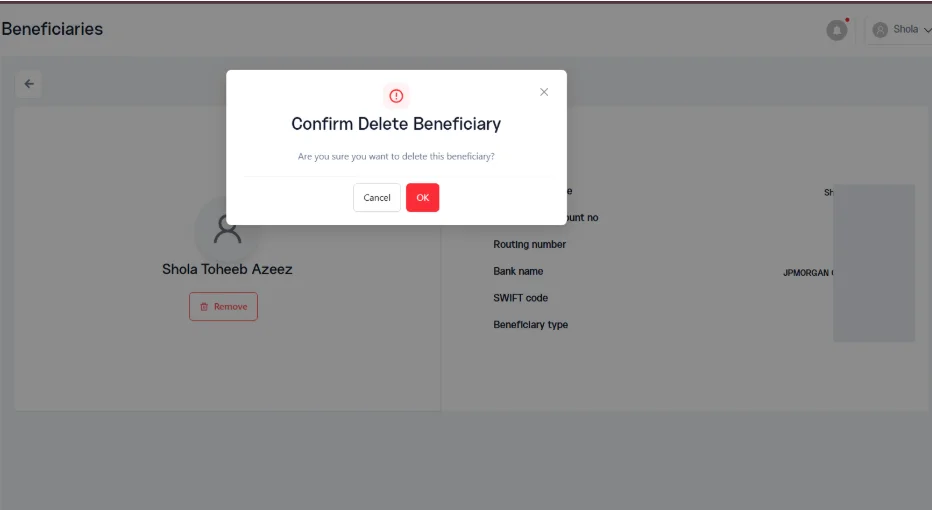
If you ever need to send money to that vendor again in the future, you can simply add them as a new beneficiary using the same steps above.
How to Add Beneficiaries on the Clea App
Step 1: Launch the App and Sign In
Open the Clea app on your mobile device and sign in with your registered credentials if you aren’t already signed in.
Step 2: Select Beneficiaries
From the menu at the bottom screen, tap Beneficiaries.
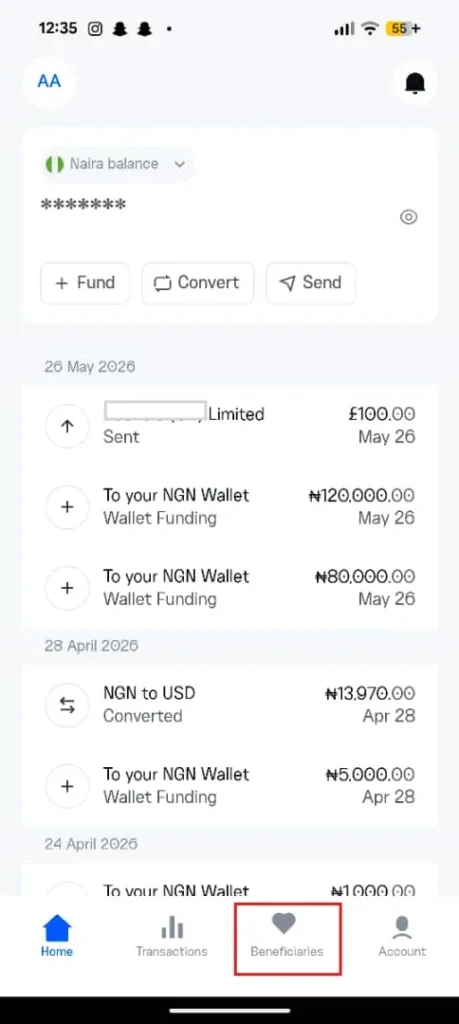
Step 3: Initiate a New Beneficiary Entry
Tap +New to start creating a new beneficiary entry.
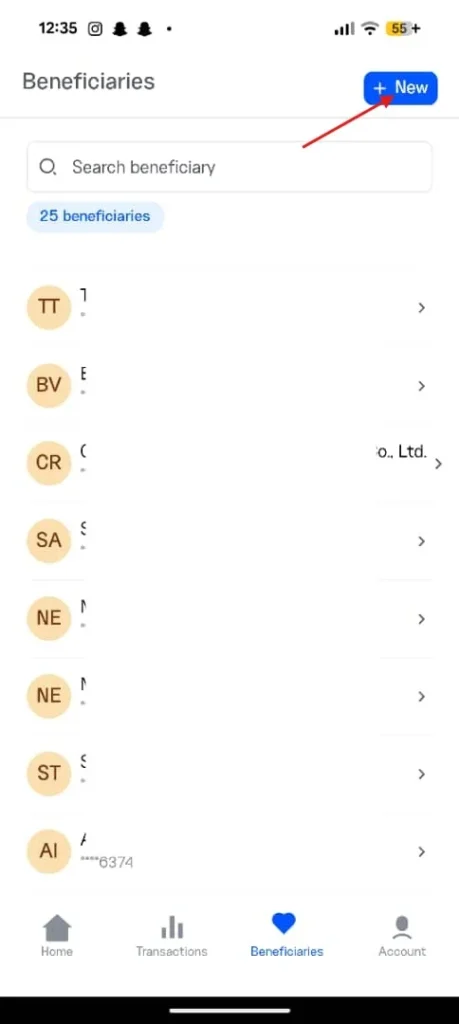
Step 4: Fill In the Beneficiary Profile
Enter the beneficiary’s identity details, including their name, type, industry, relationship, address, and country.
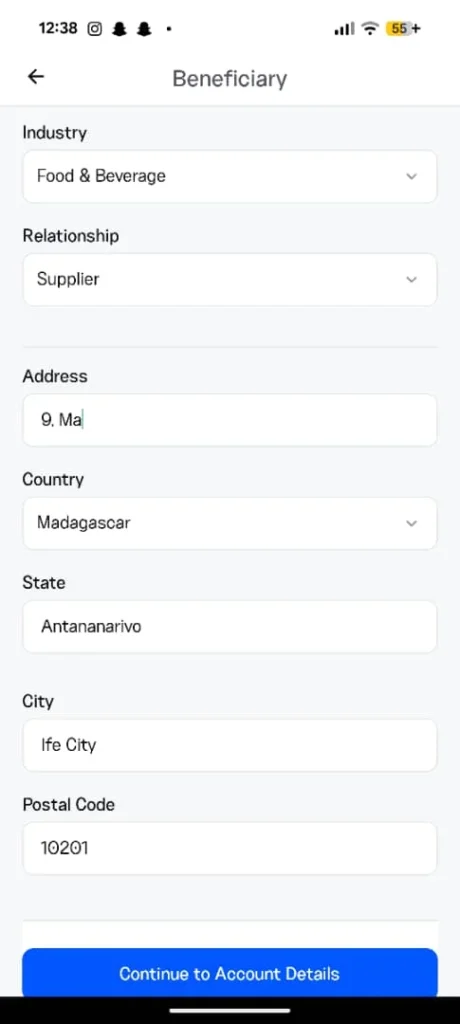
Once complete, tap Continue to Account Details.
Step 5: Enter the Bank Information
Provide the beneficiary’s account number, account type, payment method, and any required routing details. The app will prompt you for the right fields based on the payment method selected.
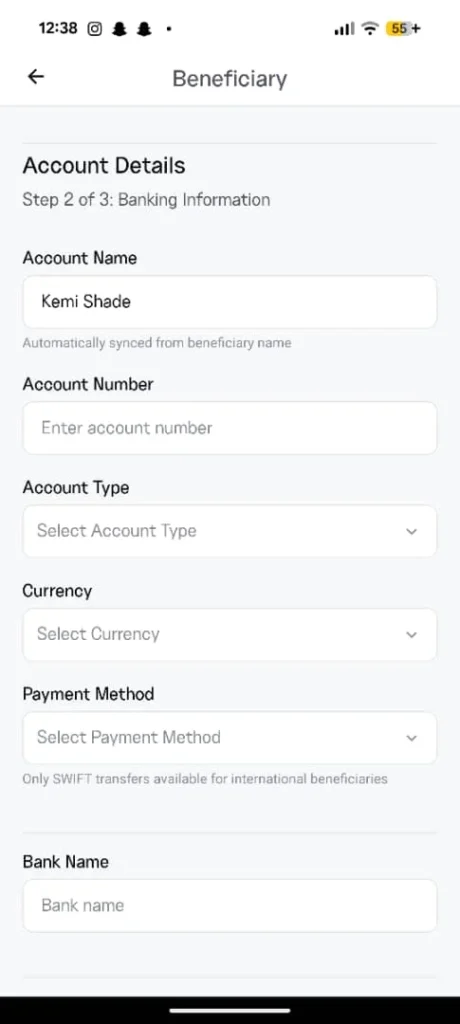
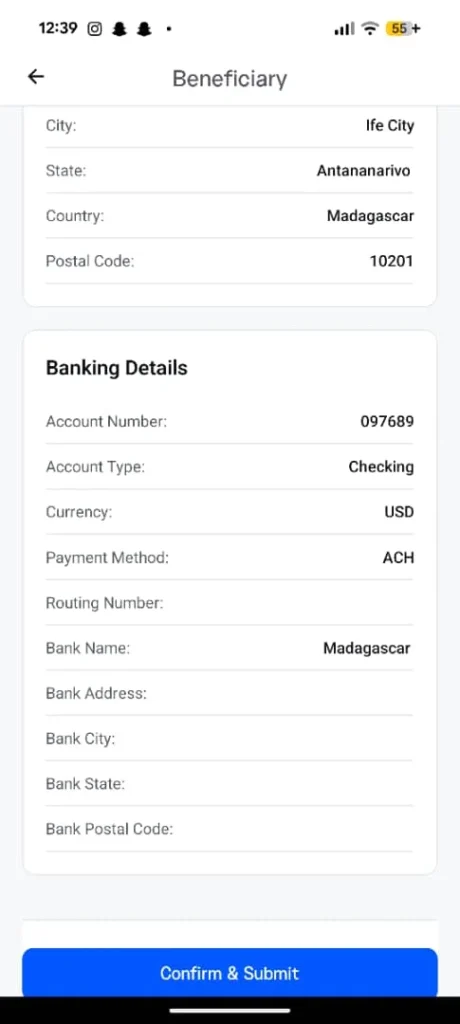
Step 6: Review and Submit
Tap Review to see a summary of the details you’ve entered. Once you’ve confirmed everything is correct, tap Confirm & Submit to save the beneficiary to your account.
Editing a Beneficiary on the Clea Mobile App
A supplier’s details can change over time – a new bank, an updated account number, or a corrected business name. The Clea mobile app lets you update a saved beneficiary’s information directly, without having to delete and recreate their profile from scratch.
Step 1: Locate the Beneficiary
Open the Beneficiaries section in the app, then search for and select the saved beneficiary you want to update.
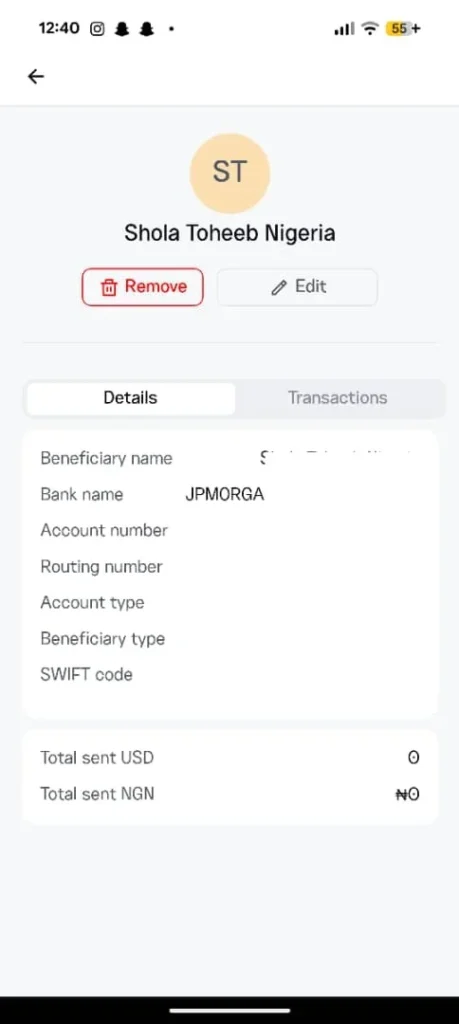
Step 2: Initiate the Edit
Within the beneficiary’s profile, tap Edit. A confirmation prompt will appear.
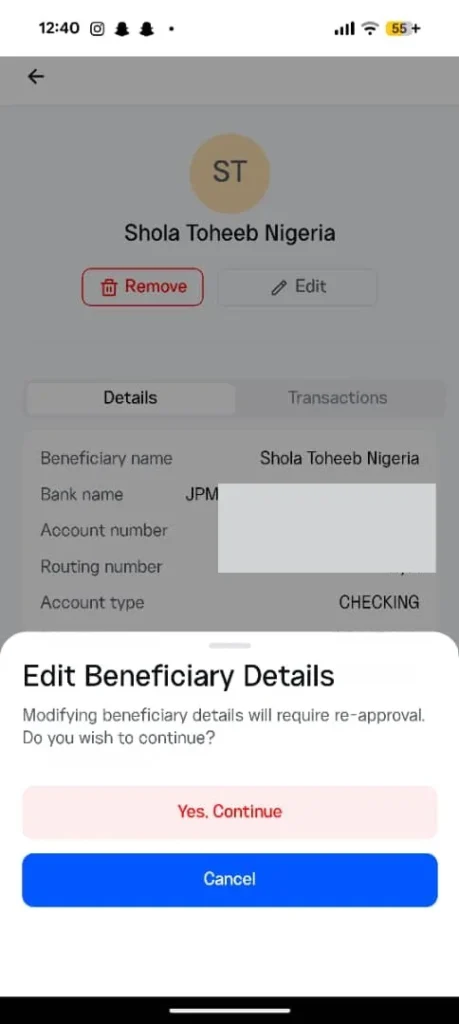
Select Yes to proceed.
Step 3: Update the Required Details
Continue to the edit screen and input the correct information. Make sure each updated field matches the source documents from your beneficiary.
Step 4: Submit for Re-approval
Save your changes. Please note that edited beneficiaries require re-approval before you can send payments to them again.
Removing a Beneficiary on the Clea Mobile App
Step 1: Locate the Beneficiary
Open the Beneficiaries section in the app, then search for and select the beneficiary you want to remove.
Step 2: Initiate the Removal
Within the beneficiary’s profile, tap Remove.
Step 3: Confirm the Action
A prompt will appear asking you to confirm. Select Yes, then tap Delete. The beneficiary is now permanently removed from your account.
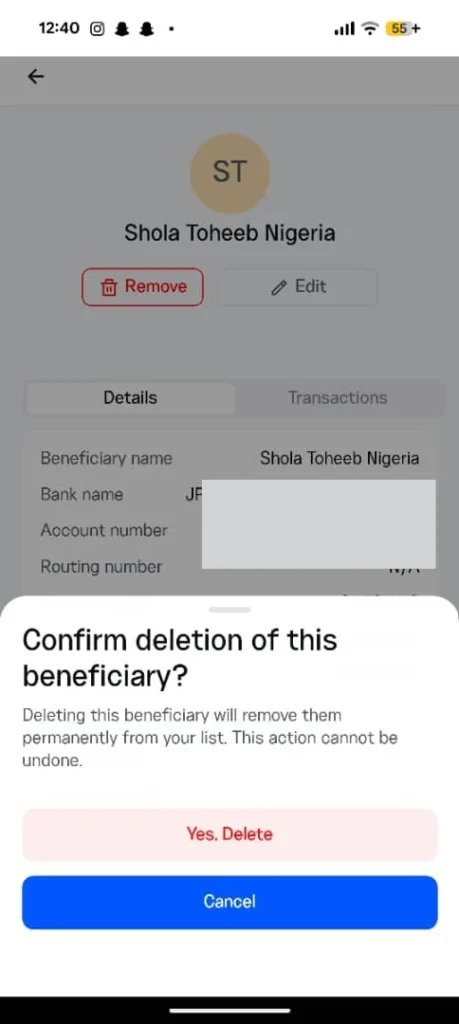
If you ever need to send money to that vendor again in the future, you can simply add them as a new beneficiary using the same steps above.
Best Practices for Managing Beneficiaries
To get the most out of this feature and reduce the risk of payment errors.
Verify details directly with your supplier: Always request bank information in writing, ideally on official letterhead or through a verified business email. Phone calls and informal chats leave too much room for mishearing.
Match names exactly: International banks routinely reject payments where the beneficiary name on the transfer doesn’t match the name on the account. Even small differences, like a missing initial or a different spelling, can cause delays.
Review before every transfer: Even after a beneficiary is saved, take a moment to confirm the details before sending each payment, especially for large transactions.
Keep your list current: Remove beneficiaries you no longer work with so your dashboard stays clean and easy to navigate.
Frequently Asked Questions
How many beneficiaries can I add to my Clea account?
Clea is built for businesses that work with multiple suppliers and partners across different countries, so there’s no practical cap on the number of beneficiaries you can save. Whether you’re managing five vendors or fifty, you can keep them all on file and pay each one as needed.
Is it safe to save my beneficiary’s bank details on Clea?
Yes. Clea is operated by Autoclear Inc., a financial technology company registered in Delaware, USA, and uses secure infrastructure to store sensitive information. Your beneficiary data is encrypted and only accessible from your verified account, which adds a layer of protection that goes beyond storing details in spreadsheets, emails, or notes apps.
Will removing a beneficiary affect my past transactions with them?
No. Removing a beneficiary only deletes their saved profile from your account. Any payments you’ve already sent to that beneficiary will remain in your transaction history, so you can still reference past transfers, view receipts, and pull records when you need them.
Can I edit a beneficiary’s details after I’ve saved them?
Yes, but only in the Clea mobile app can you edit a saved beneficiary’s details directly.